Machine Vision
Machine vision encompasses the utilization of machine vision technology in manufacturing and industrial operations to capture and analyze images, thereby ensuring consistent product quality at every stage of production. To achieve a successful inspection solution, it is crucial to carefully consider several key components, including selecting the appropriate resolution, optics, and lighting. To guarantee success, our vision lab is equipped with an extensive array of inspection tools, including lenses and lighting options, along with cameras of varying resolutions. Our team of vision engineers conduct product testing to determine the best hardware combination tailored to the specific requirements of each application. Once the testing is complete, we provide a comprehensive SCOPE document outlining the testing performed, along with recommended hardware to perform the job.
Common Machine Vision Applications
- Presence/Absence Detection
-
Color Matching
- Assembly Verification
- Robot Guidance
- Alignment and Positioning
- Gauging
- Detecting and Analyzing Defects
- Classifying/Sorting
-
OCR/OCV
-
Counting
-
Reading Barcodes
-
Process Monitoring
-
Label Inspection
-
Fill Level Inspection
-
Lot Code and Expiration Date Reading
- Bead or Seam Inspection
Machine Vision Projects
Off-Line Inspection Platform
In the pursuit of enhancing part quality and ensuring precision, we designed and built an off-line inspection system that allows us to meticulously examine and analyze parts in a controlled environment. By employing machine vision, the system seamlessly captures detailed measurements, detects imperfections, and assesses critical characteristics with unrivaled accuracy. The off-line inspection process also allows for in-depth analysis, enabling us to fine-tune manufacturing processes and implement corrective measures proactively.
In-Line Inspection Platform
Our journey to improve product quality led us to a fruitful collaboration with one of our customers who manufactures metal wire. We carefully gathered insights from the customer, understanding their specific requirements and challenges they faced regarding wire quality. From there, our dedicated team of engineers developed a customized in-line inspection system tailored precisely to the customer's needs.
This innovative inspection system revolutionized their manufacturing line by automating the inspection process vs inspecting manually.Through close collaboration and continuous feedback, we fine-tuned the system's capabilities to detect even the most minute defects, ensuring that only flawless wires make it to the final production stage.
Robotic Guided 3D Hole Inspection
Inspecting parts with complex geometries can often be very challenging. A customer came to us with a perplexing application that we were able to make a reality with a robotic guided 3D inspection system. Using a UR robotic arm with high repeatability and 3D scanners, the system can precisely position itself to scan holes from multiple angles.
The 3D scanning technology captures detailed point data throughout the hole's geometry, allowing for comprehensive and accurate dimensional analysis. This inspection method is particularly beneficial in industries where precision is crucial, such as aerospace, automotive, and medical, as it ensures that holes meet precise specifications and tolerances. By automating the inspection process, this technology significantly reduces the likelihood of human errors and increases inspection speed, thereby enhancing overall quality control and productivity.
.png)
Identifying Leaking Kegs
For many beer manufacturers, kegs are often a significant portion of their business. The reusable kegs are being cleaned, rinsed, refilled, and shipped off to customers. The issue that was addressed here was that after a certain number of refills, the neck seals would begin to leak, resulting in many issues when arriving at the end user.
To address this, we utilized an overhead Cognex camera to inspect the keg neck after being cleaned and refilled. If the seals were leaking, we were able to detect small amounts of foam and reject the keg to be further inspected by an operator. A challenge that needed to be overcome in this inspection was differentiating the residual water from the rinse cycle from the beer resulting from the leaking seal. Our engineers tested several light variations to get the most consistent image, and created a custom program that solved the problem.

Lot and Date Code Detection
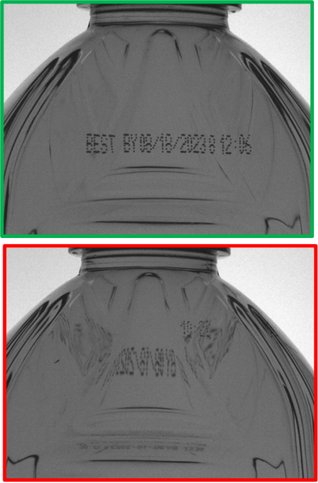
Collaborating closely with a client, we provided a robust vision system to ensure consistent inspection of lot and date codes on translucent bottles. Given the diverse array of SKUs, encompassing varying bottle hues, dimensions, and contours, meticulous testing was conducted in our vision lab.
This process determined the optimal lighting, lens configuration, and resolution required to perform the inspection. With a production line speed of 350 bottles per minute, we needed to stay under a 171.4ms inspection time. Leveraging a cutting-edge Cognex vision system, we were able to successfully perform the application requirements.
In-Line PC Board Inspection
This inline inspection system was designed to mount into an existing small footprint and receive PC boards from an upstream process. This highly flexible setup, with it's Universal Robot UR5e and Cognex camera, provides a visual inspection of the board at different specified locations. By utilizing a collaborative robot and shroud to move to the specific inspection points, we are able to utilize a lower resolution camera and provide flexibility for a wide variation of parts.
.png?width=382&height=191&name=Product%20Inspection%20(2).png)
Diameter, Bore, and Drill Hole Inspection
This is a common inspection for machined parts. We utilized a Cognex camera to verify that the correct diameter part is being loaded robotically into a horizontal CNC Lathe. Following the machining, we inspect the part again to verify the presence of both the bore and drill holes, along with their correct location and diameter.
-1.png?width=200&height=400&name=Untitled%20design%20(6)-1.png)
Surface Defect Inspection
Within the medical sector, products consistently demand a state of visual flawlessness, primarily due to their utilization in controlled settings such as surgical rooms. Consequently, each component must be subject to meticulous visual scrutiny, guaranteeing uncompromised quality. In this application, we examined white parts for any potential visual anomalies.
The anomalies encompassed a range of defects, including scratches, cracks, and variations in color. This inspection's complexity arose from the defects' diverse nature—scattered across varying locations, sizes, shapes, and hues. We opted to employ the Cognex In-Sight D900 Series camera to accomplish this challenge, as it is typically used for complex applications that are too difficult to deploy with traditional, rule-based machine vision. Leveraging the deep-learning algorithms, we accurately identified the targeted defects before the products shipped to the end user.
Our Vision Partners

Cognex machine vision systems and industrial barcode readers deliver instant improvements to any manufacturing process with superior accuracy, and minimal setup time.

Their flagship Gocator and FocalSpec product lines help factories achieve 100% inspection, reduce waste by optimization, and improve efficiency by simplifying automation.

